
Page 17 - Architects Design and Installation Manual
P. 17
Quick Facts Page | 17
● Place directly against breather-membrane Installation -Timber-Frame
● Special seal washers for ties through pods Timber-frame construction
Applies to SureCav25 & SureCav50
● Use the bend line to form the corners
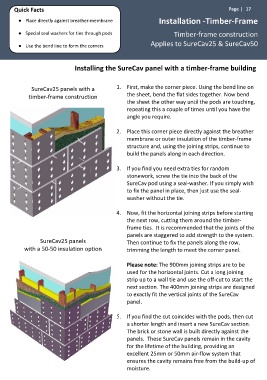
Installing the SureCav panel with a timber-frame building
SureCav25 panels with a 1. First, make the corner piece. Using the bend line on
timber-frame construction the sheet, bend the flat sides together. Now bend
the sheet the other way until the pods are touching,
repeating this a couple of times until you have the
angle you require.
2. Place this corner piece directly against the breather
membrane or outer insulation of the timber-frame
structure and, using the joining strips, continue to
build the panels along in each direction.
3. If you find you need extra ties for random
stonework, screw the tie into the back of the
SureCav pod using a seal-washer. If you simply wish
to fix the panel in place, then just use the seal-
washer without the tie.
4. Now, fit the horizontal joining strips before starting
the next row, cutting them around the timber-
frame ties. It is recommended that the joints of the
panels are staggered to add strength to the system.
SureCav25 panels Then continue to fix the panels along the row,
with a 50-50 insulation option trimming the length to meet the corner panel.
Please note: The 900mm joining strips are to be
used for the horizontal joints. Cut a long joining
strip up to a wall tie and use the off-cut to start the
next section. The 400mm joining strips are designed
to exactly fit the vertical joints of the SureCav
panel.
5. If you find the cut coincides with the pods, then cut
a shorter length and insert a new SureCav section.
The brick or stone wall is built directly against the
panels. These SureCav panels remain in the cavity
for the lifetime of the building, providing an
excellent 25mm or 50mm air-flow system that
ensures the cavity remains free from the build-up of
moisture.