
Page 14 - Architects Design and Installation Manual
P. 14
Page | 14 Quick Facts
Installation Instructions-1 ● Bend along fold line to create corner
Recommendations for use ● Allow enough flat sheet for the joining strip
Part 1 ● Use additional ties next to reveals
1. Recommendation for starting corners
Locate the bending line on the sheet and fully
bend the sheet back onto its flat face. Now
bend the sheet the other way until the pods
are touching. Repeat this a couple of times un-
til the sheet stays in the required position. Al-
so, the sheet can be bent to suit corners that
are not 90° such as some conservatory walls
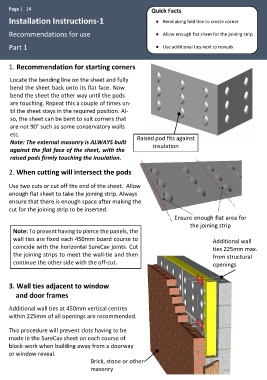
etc. Raised pod fits against
Note: The external masonry is ALWAYS built insulation
against the flat face of the sheet, with the
raised pods firmly touching the insulation.
2. When cutting will intersect the pods
Use two cuts or cut off the end of the sheet. Allow
enough flat sheet to take the joining strip. Always
ensure that there is enough space after making the
cut for the joining strip to be inserted.
Ensure enough flat area for
the joining strip
Note: To prevent having to pierce the panels, the
wall ties are fixed each 450mm board course to Additional wall
coincide with the horizontal SureCav joints. Cut ties 225mm max.
the joining strips to meet the wall-tie and then from structural
continue the other side with the off-cut. openings
3. Wall ties adjacent to window
and door frames
Additional wall ties at 450mm vertical centres
within 225mm of all openings are recommended.
This procedure will prevent slots having to be
made in the SureCav sheet on each course of
block-work when building away from a doorway
or window reveal.
Brick, stone or other
masonry